How to Light a 1:18 Scale Model Diorama (2026 Guide)
Table of Contents
- Why Lighting Changes Everything in a 1:18 Scale Diorama
- LED Lighting for Model Car Display: Choosing the Right Source
- Step-by-Step: Positioning Lights Around Your Model
- How to Reduce Glare in a Display Case
- 1:18 Scale Car Display Case with LED Lights: What to Look For
- Battery-Powered LED Lights for Dioramas: Portable and Practical Options
- Lighting for Photography vs. Permanent Display
- Conclusion: Build a Lighting Setup That Does Your Collection Justice
- Frequently Asked Questions
Last Updated: October 6, 2026
Why Lighting Changes Everything in a 1:18 Scale Diorama
A 1:18 scale model diorama without light is just a shelf with cars on it. Add the right lighting, and the same display becomes a scene: paint flake pops, chrome glints, and a diecast muscle car suddenly looks like it is sitting in a real showroom at dusk. At YCID Diecast and Dioramas, we build display environments for collectors, so we see the difference constantly. Learning how to light a 1:18 scale model diorama comes down to three things: the right light source, the right placement, and control of glare.
The good news is that you do not need a studio. Most collectors get great results with simple LED strips, a desk lamp, and a few small adjustments.
LED Lighting for Model Car Display: Choosing the Right Source
LED lighting for model car display is the standard choice for one reason: LEDs run cool. Old incandescent bulbs throw heat that can warp thin plastic parts and dry out decals over time. LEDs stay cool to the touch, sip power, and last for years. But "LED" alone tells you almost nothing about how a strip will actually look on a 1:18 diecast. Two strips with the same price tag can make the same model look like two different cars.
Here is what to look for, in the order that matters most:
- Low voltage: 5V USB or 12V DC strips are safe and easy to power
- Dimmable: lets you control brightness without swapping bulbs
- Adhesive backing: simple to mount inside a roof or under a shelf
- Warm or neutral white: reads as natural light on paint and chrome
Skip anything that gets hot within a minute of switching on. If you can feel real heat, it does not belong near a model.
Color Temperature and CRI: What to Look For
Color temperature is measured in Kelvin (K), and it decides the mood of your whole display. For a garage diorama, 3000K to 4000K gives a warm, nostalgic look. For a clean showroom feel, 5000K to 6500K reads brighter and cooler.
CRI, or color rendering index, tells you how faithfully a light shows true color. Aim for CRI 90 or higher. A low-CRI bulb can make a red muscle car look orange and wash out interior detail.
Brightness, Beam Angle, and Strip Density
Kelvin and CRI get all the attention, but three more numbers decide whether a 1:18 scene looks like a showroom or a crime scene.
Brightness (lumens). A 1:18 car is roughly 10 to 11 inches long, so the lit area is small. A single 12-inch strip rated around 300 to 500 lumens is usually plenty for one car; two or three cars under one roof may want 800 to 1,200 lumens total. More lumens is not better, past a point, paint highlights clip to white and you lose the metallic flake you were trying to show off.
Beam angle. A 120-degree strip throws light in a wide wash, which is what you want for a ceiling or under-shelf source. A 30- to 60-degree spot is what you want for an accent aimed at a grille, engine bay, or wheel. Mixing the two is how you get depth instead of flat, even light.
Strip density. LED strips are sold by the number of LEDs per meter. A 60 LED/m strip produces visible dots on a glossy hood; a 120 LED/m or 144 LED/m strip reads as a continuous line. For a 1:18 scale roof or under-shelf run, higher density is worth the small price difference because the dots are the first thing a collector notices.
Voltage drop. On runs longer than about 16 feet, the far end of a cheap strip dims and shifts warmer. For a single 1:18 diorama this rarely matters, but if you are lighting a multi-level display, feed power from both ends or split the run into shorter segments.
A Quick Reference for 1:18 Scale
Look |
Color Temp |
CRI |
Typical Use |
|---|---|---|---|
Vintage garage |
2700K-3000K |
90+ |
Wood-paneled shop, warm bulbs |
General display |
3500K-4000K |
90+ |
Neutral, easy on the eyes |
Modern showroom |
5000K-5700K |
90+ |
Clean, bright, dealership feel |
Cool studio |
6000K-6500K |
90+ |
Photography, high-contrast scenes |
If you only remember one rule: pick 4000K and CRI 90+ for a first setup. It is the safest middle ground for diecast paint, chrome, and interiors, and it looks correct in almost any 1:18 scene.
Step-by-Step: Positioning Lights Around Your Model
Positioning is where most setups go wrong. People hang one bright strip in the middle and call it done, and the result is a blown-out roof and dark fenders.
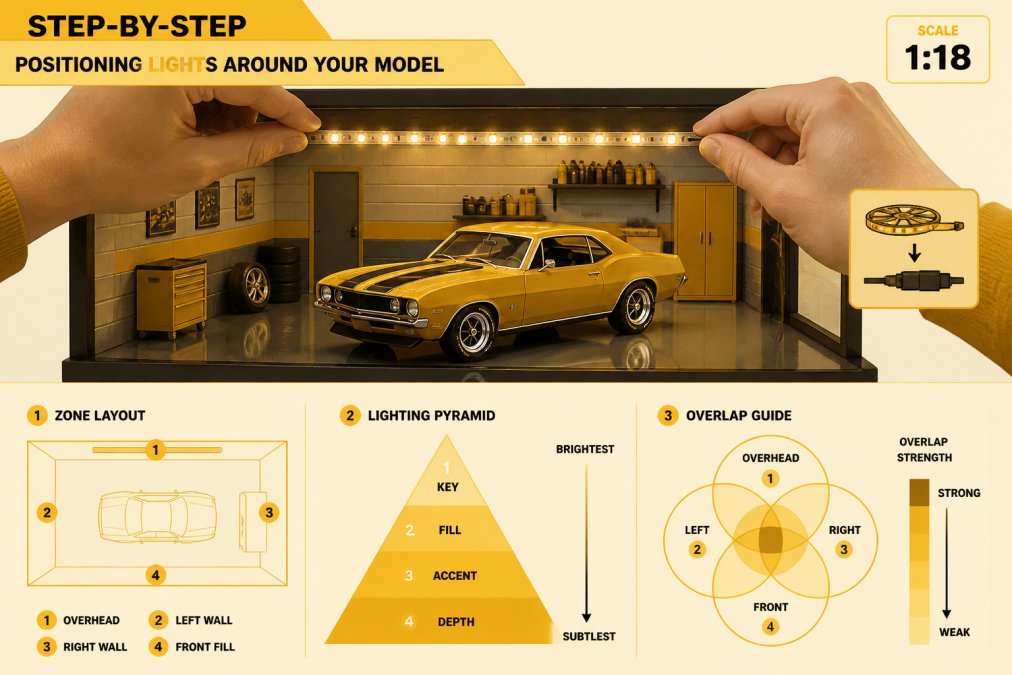
Wiring and Power Planning
Plan your power before you mount anything. Most small LED strips run on a USB plug, and a basic USB-to-outlet adapter is inexpensive and easy to find at any drugstore or big-box store. For our own dioramas, like the 1/18 scale Universal 2 Car Garage, the ceiling light runs on a USB plug, so you just add the wall adapter.
1/18 scale Crankys Speed Shop →

How to Reduce Glare in a Display Case
Glare is the number one complaint we hear about lit displays. The fix is diffusion, not less light. Bare LED strips create hot spots that bounce off glass and chrome. Diffused light spreads evenly and kills those bright reflections.
1:18 Scale Car Display Case with LED Lights: What to Look For
A 1:18 scale car display case with LED lights should protect the model and show it off at the same time. The best cases combine a dust seal, a slide-out or removable front, and built-in ceiling lighting with an on/off switch.
Check these features:
- Dust protection: a sliding front panel keeps models nearly dust free
- Built-in lighting: ceiling LEDs with a simple switch beat loose strips
- Access: a slide-out panel lets you swap cars without disassembly
- Scale fit: a case sized for 1:18 will not crowd 1:24 or 1:64 models
Our Mr Norms Grand Spaulding Dodge Showroom Dioramas come with ceiling lights and an on/off button, plus a slide-out front panel for changing models. The Universal 3 Level Dealership takes the same idea vertical, with each floor holding three to four models.

Battery-Powered LED Lights for Dioramas: Portable and Practical Options
Battery-powered LED lights for dioramas solve the cable problem. If your display sits on a shelf far from an outlet, or you like to move it for photos, battery power keeps things clean with no wires trailing across the room.
Common options:
- Puck lights: stick-on discs, great for a single car or a small garage scene
- Battery strip kits: run on AA or AAA cells, good for longer runs
- Rechargeable bars: USB-charged, then placed anywhere
The trade-off is runtime. Battery lights dim as the cells drain, so colors shift over time. For a permanent display, wired USB lighting stays consistent. For a portable setup or a quick photo session, battery power is hard to beat.
Lighting for Photography vs. Permanent Display
Photography lighting and display lighting want different things. For photos, you want control: a handheld strobe or a camera on bulb mode lets you trigger a pop flash and walk around the model, building up light exactly where you want it. A dark room plus a single flash gives you dramatic, magazine-style shots.
For permanent display, you want even, steady, diffused light that looks good to the eye every day. That means dimmable LEDs, a diffuser, and placement that avoids glare.
Goal |
Best Light Source |
Placement |
Key Setting |
|---|---|---|---|
Permanent display |
Dimmable LED strip |
Above, 45 degrees |
Low, even output |
Product photos |
Handheld strobe |
Off-camera, movable |
Bulb mode |
Portable setup |
Battery puck lights |
Anywhere |
Full brightness |
Showroom look |
Daylight LED, CRI 90+ |
Front and overhead |
5000K to 6500K |
Conclusion: Build a Lighting Setup That Does Your Collection Justice
Getting the light right is the difference between a shelf of cars and a display people stop to look at. If you would rather skip the wiring and start with a finished scene, our pre-built dioramas come with ceiling lighting and slide-out access already in place. Browse the Crankys Speed Shop and our full diorama lineup to find a display that lights up your collection from day one.

Frequently Asked Questions
How do you light a 1:18 scale model diorama?
Many YCID dioramas, like the Universal 2 Car Garage, include working ceiling lights with a USB plug, so you only need a wall adapter to get started.
What type of LED lights work best for a 1:18 scale car display?
Dimmable LED strips and small puck lights rated 5000K with a CRI above 90 give the most accurate color rendering for diecast paint and chrome. USB-powered strips are convenient for plug-in setups, while battery-operated LEDs suit shelves without outlets. Avoid cool blue or very warm bulbs, which distort metallic finishes and make interiors look muddy.
How do you reduce glare on a diecast car display case?
Angle lights so they hit the model at 30 to 45 degrees rather than straight down, add a diffuser over the LED source, and keep a matte or reflective base positioned to bounce light softly. If your case has glass or acrylic, tilt the light away from the front panel. Dimming the output also cuts hot spots on chrome bumpers and windshields.
Can you add lighting to a 1:18 scale display case?
Yes. YCID dioramas such as the Mr. Norms Grand Spaulding Dodge Showroom come with ceiling lights and an on/off button, so you only need a USB wall adapter, which costs about $5.00 at most drugstores or big-box retailers.