How to Prevent Diecast Paint Damage: 7 Essential Steps
Table of Contents
- Understanding What Causes Diecast Paint Damage
- How to Protect Diecast Cars from Scratches During Handling
- How to Clean Diecast Models Without Damaging Paint
- How to Dust Diecast Cars Safely and Regularly
- Diecast Model Storage Tips for Long-Term Protection
- Displaying Your Models While Preventing Paint Damage
- Creating a Prevention Checklist for Your Collection
- Frequently Asked Questions
Last Updated: October 13, 2026
Understanding What Causes Diecast Paint Damage
To prevent diecast paint damage, you must understand its four predictable sources: physical contact, moisture, light, and handling.
Scratches come from rough surfaces or hard grips. Paint rash, that rough, speckled texture, develops when moisture seeps under the clear coat and separates paint from base metal.
Your diecast model is more fragile than it looks: thin paint, a delicate clear coat, and metal underneath that corrodes with moisture.
How to Protect Diecast Cars from Scratches During Handling
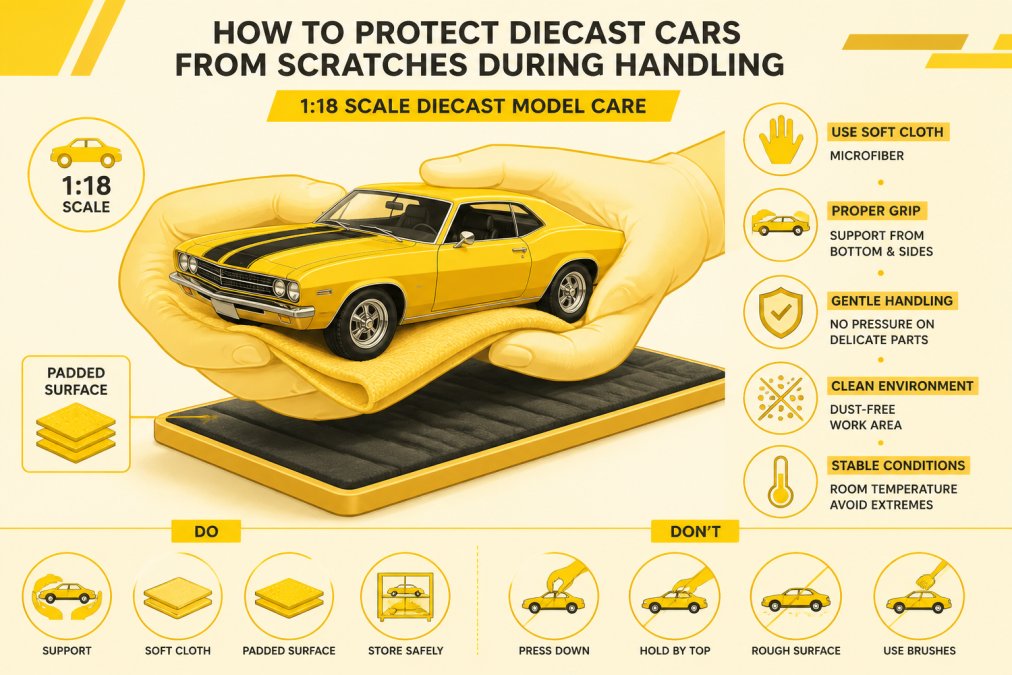
Scratches are the most common diecast damage, occurring during display setup, photography, cleaning, and handling. Proper technique eliminates most of the risk.
Safe Grip and Movement Techniques
Hold your model with fingertips on the base or undercarriage, never painted surfaces.
When moving a model, support it from below with both hands and never grip the sides or roof.
For models with mirrors, antennas, or spoilers, support the weight on the chassis, not the protruding pieces, these break easily.
When photographing, place the model on a padded mat or foam base.
Avoiding Contact with Rough Surfaces
The surfaces your model touches matter as much as how you hold it. Never place a diecast car directly on wood, concrete, or textured plastic, all abrasive enough to scratch the finish.
Instead, use soft surfaces:
- Microfiber display cloths
- Foam padding or museum-quality foam
- Soft felt mats
When moving models between storage and display, lay down a soft cloth first, it prevents damage that is impossible to fully repair.
Avoid fans, air vents, and open windows, where dust settles on paint and causes micro-scratches when wiped away incorrectly.
How to Clean Diecast Models Without Damaging Paint
Cleaning keeps your model sharp, but done wrong it scratches and dulls the finish.
Step-by-Step Cleaning Process
Start by assessing the dirt. Light dust requires only a soft dry cloth. Stubborn dirt or fingerprints need gentle washing.
For dry cleaning:
- Use a clean microfiber cloth
- Wipe gently in one direction
- Never rub in circles, this creates micro-scratches
- Focus on the top surfaces first, then move to the sides
For wet cleaning:
- Fill a bowl with lukewarm distilled water
- Add a single drop of mild dish soap
- Dip a soft cloth into the solution (do not submerge the model)
- Wipe the model gently, one section at a time
- Use a second cloth dampened with plain distilled water to rinse away soap residue
- Dry immediately with a clean, dry microfiber cloth
Never let water sit on the model, evaporation leaves spots and moisture seeps into crevices, causing rust.
Avoid high-pressure water or sprays, which force water into gaps and damage decals.
Safe Products and Materials
Use only materials that won't scratch or chemically damage the finish. Microfiber cloths are soft, lint-free, and safe for delicate surfaces.
Safe cleaning materials:
- Distilled water (tap water contains minerals that leave spots)
- Mild dish soap (one drop per bowl of water)
- Microfiber cloths (multiple cloths for different stages)
Never use:
- Paper towels (too rough)
- Regular cloth napkins (leave lint)
- Compressed air (forces moisture and dust into crevices)
Diecast paint is factory-applied and clear-coated, not built for aggressive cleaning.
How to Dust Diecast Cars Safely and Regularly
Regular, gentle dusting prevents buildup that demands aggressive cleaning later.
Dust open-display models every two to four weeks; closed cases need it monthly or quarterly.
Dust with a microfiber cloth, wiping along the body lines and contours to avoid catching edges or details.
Never dust a wet or damp model, the cloth drags and creates scratches.
Diecast Model Storage Tips for Long-Term Protection
How you store a 1:18 scale diecast replica determines whether its factory finish survives decades or degrades in one season. Storage is several problems, each needing its own countermeasure.
Match the Storage Condition to the Damage Mechanism
Most collectors treat "cool and dry" as the whole answer, but each damage mechanism has its own trigger, and a condition that prevents one can accelerate another.
| Damage mechanism | What triggers it | Preventive countermeasure |
|---|---|---|
| Abrasion | Model sliding or resting on a hard, textured surface | Padded, lint-free shelf liners; no direct contact with bare wood or metal shelving |
| Paint transfer | Two painted surfaces pressed together, or contact with printed packaging | Spacing between models; acid-free tissue between the model and any printed card |
| Corrosion | Sustained relative humidity above roughly 60 percent | Silica gel, ventilation, and a stable 30-50 percent RH target |
| Fading | Ultraviolet light and sustained heat | Opaque storage, interior placement, no direct sun |
| Finish deterioration | Off-gassing from certain plastics and foams, plus temperature cycling | Inert storage contact materials; stable temperature |
A sealed container solves abrasion and fading but worsens corrosion; a sunny shelf solves corrosion but accelerates fading. The goal is a combination, not a single fix.
Temperature, Humidity, and Light Targets
Aim for a stable 60-75 degrees Fahrenheit. Stability matters more than the number, because repeated expansion and contraction works the clear coat against the base metal and can lift decals.
Hold relative humidity between 30 and 50 percent.
Keep stored models out of direct light. Ultraviolet exposure fades reds, oranges, and yellows fastest, so an opaque box or closed cabinet beats a shelf that merely sits away from a window.
Boxed Versus Loose Models
These two categories carry opposite risks, and the same storage method can hurt one while helping the other.
Boxed or carded models. The packaging itself is a contact surface: printed cardboard and some foams can off-gas over years, and that residue can transfer to paint or cloud a clear window.
Loose models. A loose 1:18 replica has no packaging to absorb shock, so abrasion and paint transfer become the primary risks.
Moisture Control That Actually Works
Silica gel packets absorb excess moisture but saturate, so replace them every two to three months, or sooner if the indicator color changes.
Ventilation and moisture absorption work together.
Inspect storage monthly for condensation, a musty smell, or discoloration at metal edges, any of those signals means the environment has drifted and needs correction before damage shows on the paint.
Storage Contact Materials
What touches the model matters as much as the room it sits in. Use inert, lint-free contact materials: acid-free tissue, soft felt, and clean microfiber. Avoid bare wood, which can be acidic, and unidentified foams, which may off-gas.
If you display rather than box your collection, our finished 1:18 scale display dioramas are built to hold models in a stable, padded environment, so the storage question and the display question become the same answer. browse finished 1:18 scale display dioramas
Displaying Your Models While Preventing Paint Damage
Display is where a collection spends most of its life, so it is where most slow damage happens. The wrong setup looks fine for a year and then shows up as dulled paint, clouded windows, or transfer marks.
Paint-Safe Display Materials
Not every clear material is safe to enclose a painted model in. The two risks are physical contact and chemical interaction.
Physical contact. Glass and acrylic are fine as case panels, but shelves are where models rest.
Chemical interaction. Some plastics and foams used in inexpensive cases and inserts can off-gas over time, and that residue can dull a clear coat or cloud a window.
Test Before You Commit
Before trusting any new case, liner, or contact material with a valued model, test it on a discreet area first. The underside of the chassis or an inner wheel well is ideal, because it is painted but rarely seen.
A simple test routine:
- Place a small piece of the new material against the discreet area.
- Leave it in place for a week or two under normal display conditions.
- Remove it and inspect the paint under bright, angled light for any dulling, tackiness, or color shift.
- Only then use the material against visible surfaces.
This catches the rare material that reacts badly with a particular finish. Inert, lint-free materials generally pass; unidentified foams generally fail.
Positioning Away from Environmental Hazards
Location does as much work as the case itself. Keep display cases away from:
- Direct sunlight, which fades reds, oranges, and yellows fastest
- Heating and cooling vents, which create temperature swings
- Radiators and other heat sources, which can warp plastic components
An interior wall in a climate-controlled room is safest. Bedrooms and living rooms beat basements and attics, which swing in both temperature and humidity. Keep the case out of high-traffic paths.
Handling Models During Display Changes
Most display damage happens in the few seconds a model is being moved, not while it sits. A short, consistent routine prevents nearly all of it.
- Hold the model by the base or undercarriage, never by the roof, mirrors, or spoiler.
- Support the weight from below with both hands.
- Set the model down on a padded surface before adjusting anything else.
For models with delicate protruding details, treat those parts as non-load-bearing: they are the first to break and the hardest to repair invisibly.
Transport and Repositioning
Moving a model between rooms or to a new display is the highest-risk moment in its life. Before transport, place it in a padded, snug container where it cannot slide.
If you are moving a full collection, move models one at a time or in individual padded slots. A single bump between two painted surfaces can leave a transfer mark that is difficult to remove.
Choosing a Display That Does the Work for You
A well-made display removes most of these variables. Look for cases with tempered glass or acrylic panels, padded or lined shelves, and construction that keeps dust out without trapping humidity. Our finished 1:18 scale display dioramas are built to hold models in a stable, padded environment with authentic scenery, so the display and the protection are the same product. shop finished 1:18 scale display dioramas
Creating a Prevention Checklist for Your Collection
A simple routine prevents most damage. Use this checklist monthly to stay on top of collection care.
| Task | Frequency | Why It Matters |
|---|---|---|
| Inspect models for dust buildup | Monthly | Prevents need for aggressive cleaning |
| Dust with microfiber cloth | Every 2-4 weeks | Removes particles before they settle |
| Check storage humidity levels | Monthly | Catches moisture problems early |
| Replace silica gel packets | Every 2-3 months | Maintains dry storage environment |
| Inspect for signs of rust or corrosion | Quarterly | Early detection prevents spread |
| Verify display case is secure and stable | Quarterly | Prevents accidental tipping or movement |
| Review handling practices | Quarterly | Keeps safe techniques top of mind |
Post this checklist near your storage or display area. It takes five minutes per month and prevents hours of damage assessment and repair attempts.
Frequently Asked Questions
What is paint rash on diecast models and how do I prevent it?
Paint rash occurs when the paint finish flakes or chips off a diecast model, usually from friction, contact with abrasive surfaces, or improper handling. Prevent it by using a microfiber cloth when handling, storing models in a display case with padding, and avoiding stacking models directly on top of each other. Always support the model from underneath rather than gripping the painted body.
How often should I clean my diecast model collection?
Clean displayed diecast models every 2-4 weeks depending on dust accumulation in your environment. Use a soft microfiber cloth to gently wipe the surface. For models in sealed display cases, cleaning can be less frequent. Avoid over-cleaning, as excessive handling increases the risk of paint damage. Inspect models regularly for dust buildup and address it promptly.
Can sunlight fade the paint on my diecast models?
Yes, direct sunlight will fade diecast paint over time, especially bright colors and metallic finishes. Display your collection away from windows and direct light sources. If you display models in a cabinet, use a display case with UV-protective glass. Rotate models periodically if some receive more light exposure than others to ensure even aging across your collection.
What household cleaners are safe for diecast models?
Avoid harsh chemical cleaners that can damage clear coat and paint. Use only distilled water and a soft microfiber cloth for routine cleaning. For stubborn dust, add a single drop of mild dish soap to distilled water, dampen the cloth slightly, and wipe gently. Never use abrasive cleaners, alcohol-based products, or rough cloths. Always test any cleaning solution on an inconspicuous area first.
Protecting your diecast model collection comes down to understanding what causes damage and building simple habits. The models you've invested in deserve care that matches their quality. YCID Diecast and Dioramas creates finished, ready-to-display dioramas and models designed to last for decades when stored and handled properly. Explore our collection of precision 1:18 scale American muscle cars and professionally crafted display environments that make protection and preservation effortless.